")
")
Setting up emails
Setting up emails in Bp Event is a two-step process: first, set up an email server. Then, proceed to create email accounts for users or user groups.
-
- Create an email server
- Go to the
 Administration tab in the function bar and select
  Settings > General settings >
  Emails.
 - Click on
 New to add an email server.
 - Enter a unique, speaking Name for the email server.
- Enter an OAuth 2.0 Sync Server.
Note: If you use the OAuth procedure for authentication on the email server, a corresponding sync server must be set up. - Enter the IP address / DNS name of the server dedicated to sending emails in the Outgoing mail server field.
Note: Enter individual ports in IP:Port format (e.g. 127.0.0.1:25). - Select SMTP encryption if necessary:
a) Automatic (TLS)
b) none
c) SSL - Tick SMTP authentication if required.
- Tick Send via server if emails must be sent from the IP address of the server in your system environment (exceptional case).
Note: By default, emails are sent from the IP address of the Bp Event Client. - Select a Type (receipt log)
a) POP 3
The emails are downloaded from the email server and can be deleted from the server immediately. If the emails are downloaded to another device, it is not possible to determine which emails have already been read or edited.
b) IMAP
The emails remain on the email server and are only synchronised. Emails that have been read or edited are also displayed on other devices. Individual mailbox folders can also be synchronised.
c) IMAP Download
Emails are downloaded from the email server using the IMAP protocol (similar to POP3). - Activate the SSL/TLS encryption if the incoming mail server supports this.
- Set an individual Recycle bin folder (only possible with IMAP).
- Set an individual Spam folder (only possible with IMAP).
- Set a Sent folder if emails sent to the email server are to be displayed (only possible with IMAP).
- To delete emails directly from the server after loading, tick Delete emails after loading (only possible with POP 3).
- Specify the number of days after which the emails should be deleted in the Delete after column (only possible with POP 3).
 Save the settings.
- Go to the
- Define further settings for emails
- Go to the Administration tab in the function bar and select Settings > General settings > Emails.
- Tick Hide email in function bar if you do not want to use the Bp Event email functionality.
Example: Bp Event users only send emails from Bp Event. - Below the email servers, click on the button Schedule automatic mail download. Enter the desired retrieval series and save the setting.
Note: Email retrieval is set for every 15 minutes by default. - To display the outgoing emails of a user (and their groups) in another tab, tick Show sent-mail folder in mailbox.
- To prevent indiviual manual retrieval of emails when an email retrieval series has been set, tick Forbid manual email refresh.
- Note: Tick the Allow reloading email option only after consultation with the Bp Event Hotline or IT. This option allows users to reload emails that have already been downloaded.
- Tick Lock after sending to prevent emails that have already been sent from being changed (revision security).
- Save the settings.
- Go to the
- Create email accounts for individual users
Each user can have one or more user accounts.
- Go to the Administration tab in the function bar and select
 Users to open a User record.
 - Switch from the General tab to the
 Email account tab.
 - Click on New to add one or more email accounts.
- Enter the email user name for authentication in the Account user field. The email address itself is often used for this purpose.
- Enter the email password in the Password/Connect field.
- Select a Company (Multi-companies module) if you want to distinguish between companies for filing purposes.
- Enter the email address of the user.
- Enter a different email address in the Reply To field (if needed) to forward replies to that email address.
Note: Sent emails will still show the user's email address as sender address. - In the Alias field, enter a name that should be given to the recipient as the sender name.
Note: This field defaults to the email address. - Tick the column
 to enable email delivery.
 - If you want to send a blind copy of all outgoing emails from this account, enter an email address in the Send BCC field.
- Tick the column
 to enable email reception.
 - Enter an individual Mailbox folder (only possible with IMAP).
- Enter an individual Recycle bin folder (only possible with IMAP).
- Enter an individual Spam folder (only possible with IMAP).
- Tick the column
 to enable out-of-office notifications.
  Save your input by clicking on the icon in the top left-hand corner of the input window.
- Go to the
- Create email accounts for user groups
- Go to the Administration tab in the function bar and select Users to open a
 User group.
Note: Use existing user groups or create new groups. - Switch from the
 Authorisations tab to the Email account tab.
 - Click on New to add one or more email accounts.
- Enter the email user name for authentication in the Account user field. The email address itself is usually used for this purpose.
- Enter the email password in the Password/Connect field.
- Select a Company (Multi-companies module) if you want to distinguish between companies for filing purposes.
- Enter the user group Email address
- Enter a different email address in the Reply To field (if needed) to forward replies to that email address.
Note: Sent emails will still show the user group's email address as sender address. - In the Alias field, enter a name that should be given to the recipient as the sender name.
Note: This field defaults to the email address. - Tick the column to enable email delivery.
- If you want to send a blind copy of all outgoing emails from this account, enter an email address in the Send BCC field.
- Tick the column to enable emails reception.
- Enter an individual Mailbox folder (only possible with IMAP).
- Enter an individual Recycle bin folder (only possible with IMAP).
- Enter an individual Spam folder (only possible with IMAP).
- Tick the column to enable out-of-office notifications.
Note: Out-of-office notes for user groups are only required in very rare cases. Use a formula for customised solutions. - Save your input by clicking on the icon in the top left-hand corner of the input window.
- Go to the
- Test the mailbox access data
User and group mailboxes can be tested.
- Select the mailbox and click on Test access data.
- Bp Event will check the settings and send a notification of successful registration, sending and receiving.
- Check the requirements for switching to OAuth 2.0
Microsoft 365 requirements
The user will need IMAP/POP3 and Authenticated SMTP authorisation for the email account in Microsoft 365.
https://docs.microsoft.com/de-de/exchange/clients-and-mobile-in-exchange-online/authenticated-client-smtp-submission
- Set up OAuth 2.0 in Bp Event
Create a new Sync. Server
- Go to the Administration tab in the function bar and select Settings >
 Interfaces >
  Synchronisation.
 - Add a new Sync. Server with the type OAUTH2.
- Enter a unique name, we recommend "M365 OAUTH2".
- Select Microsoft 365 Email as server type.
- Tick the box Use default settings.
- Save your input by clicking on the icon in the top left-hand corner of the input window.
Store the new Sync. Server in the email settings
- Go to the Administration tab in the function bar and select Settings >
> Emails.
- To add the OAuth 2.0 Sync. Server to the Microsoft 365 email server, select the sync server you have just created from the selection list.
- Save your input by clicking on the icon in the top left-hand corner of the input window.
Important: After setting up OAuth 2.0 authentication, the email accounts from Bp Event still need to be connected to Microsoft 365.
- Go to the
- Link individual user email accounts with Microsoft 365
Important: After setting up OAuth 2.0 authentication, the email accounts from Bp Event still need to be connected to Microsoft 365.
- Go to the Administration tab in the function bar and select Users > User >
 Search.
 - Open the user you want.
- Go to the Email account tab.
- To connect the email account with Microsoft 365, the password must be editable.
Ask the user to log in to Bp Event again.
- Go to the
 Options tab in the function bar and select Change email password. A Microsoft dialogue will open in the standard web browser for authentication.
 - Authenticate yourself in the Microsoft dialogue with the same email account as in Bp Event.
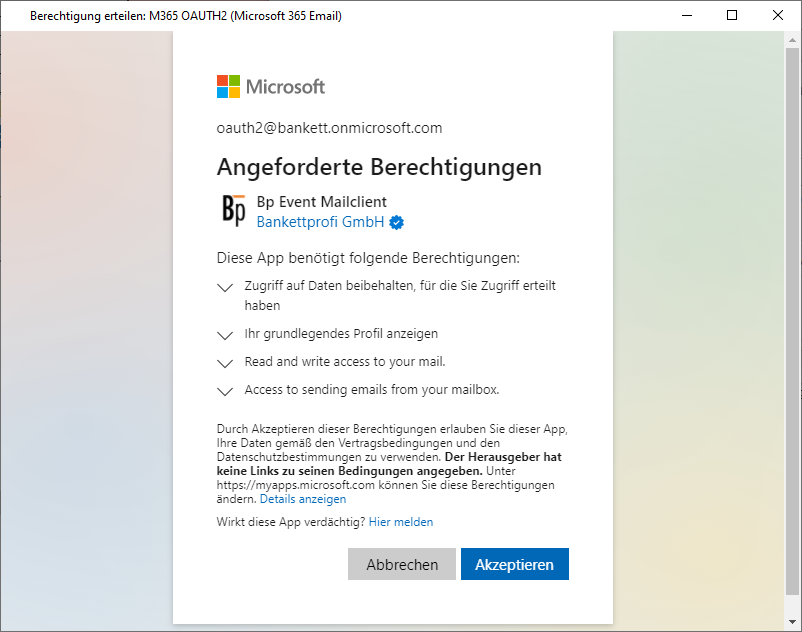
- Following successful authentication, the following authorisations must be accepted:
- You will be automatically logged out of the web browser.
- Confirm the granting of rights in Bp Event.
- Confirm the message "The authorisation code could be determined" by clicking OK.
- Carry out the test for a successful configuration. The setup is now complete.
- Go to the
- Link user group email accounts with Microsoft 365
Important: After setting up OAuth 2.0 authentication, the email accounts from Bp Event still need to be connected to Microsoft 365.
- Go to the Administration tab in the function bar and select Users > User Groups > Search.
- Open the user group you want.
- Go to the Email account tab.
- To connect the email account stored there with Microsoft, click on Connect in the Password/Connect column. The standard web browser will open with a login screen.
- Authenticate yourself in the Microsoft dialogue with the same email account as in Bp Event.
- Following successful authentication, the following authorisations must be accepted:
- After confirming the authorisations, you will be automatically logged out of the web browser.
- Confirm the message in BP Event to grant the rights.
- Confirm the message "The authorisation code could be determined" by clicking OK.
- Carry out the test for the email configuration. The setup is now complete.
- Go to the
- Create an email server
Administrator Manual


- Creating item groups
- Creating an item group package
- Setting up ESC events
- Setting tax rates
- Setting up image optimisation
- Configuring the Bp Event web server
- Creating public holidays in the Holidays/Special events calendar (Versions prior to 12.1R12)
- Setting up change notifications
- Setting up e-invoicing
- Importing public holidays/special events


