")
")
Training material 2025 / 2026
Tutorial 6
Catering from A-Z

Performance level: Advanced
Time needed approx. 60 to 90 minutes
The exercise can be interrupted and saved at any point.
Start Bp Event and log in as
User: Carolin
Password: cf
Carolin Fixit is responsible for planning and invoicing for events in the events office.
Training objectives:
- Creating an event based on a template
- Creating a quote
- Creating a detailed schedule
- Printing a customer contract
- Creating a custom menu card
- Printing internal worksheets for kitchen and service staff
- Creating an invoice when an event is over
Objective 1 Creating an event based on a template
On completion of this exercise, you will have called up and checked the customer's account and created an event based on a template with all relevant data.
Carolin has received the following information by email:
Dear Ms Fixit,
On the occasion of our 50th company anniversary, we would like to organise a large celebration with customers and partners on our company premises. We would like to make a tentative reservation for October 15th.
We are expecting from 180 to 200 guests.
Please send us a proposal for a selection of food, decoration, staff, supporting programme, etc. The event will start at 4:30pm until approx. 2am the next morning. We would like a champagne reception with finger food to start with. Several speeches and some entertainment are planned before 6:30pm. A more detailed programme will be available later.
We would be delighted to work with you again - the memory of the delightful events you have organised for us in the past is still very much alive!
If you have any questions, please do not hesitate to contact me at any time on 0177-1234567.
Yours sincerely
Autoglas IBS GmbH
Dr. Wolfgang Mundt
Unter den Linden 54
40213 Dusseldorf
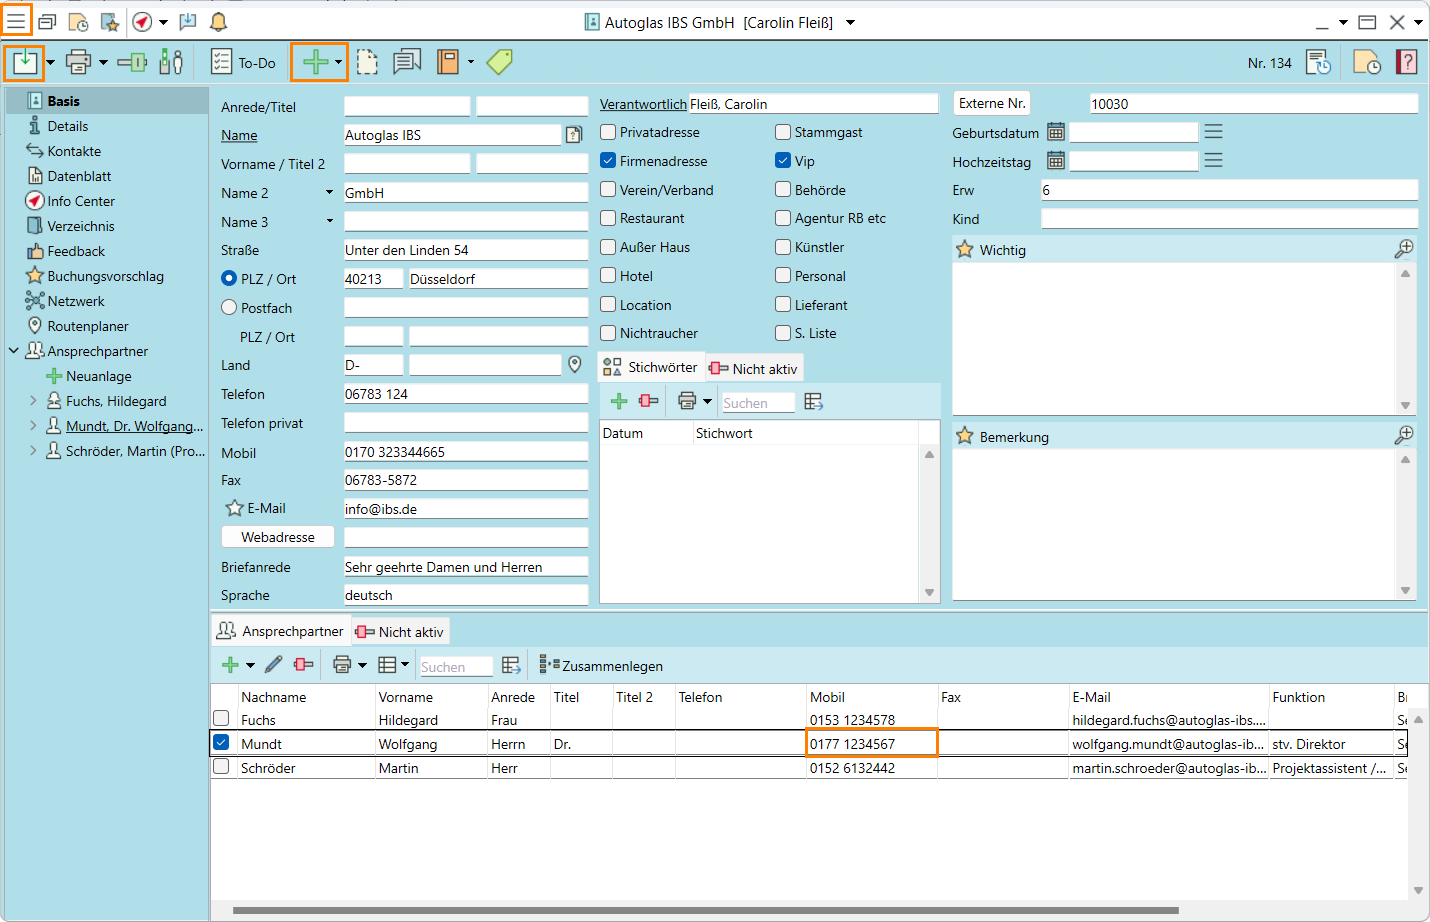
1. Open the customer account
- Go to the
 Home tab on the function bar and select
  Accounts. The account search window will open.
Alternatively, start searching for accounts by pressing the hotkey F10. - Enter the first few letters, i.e. "Autog", in the Search terms field.
- Double-click the account t.
- The company account of Autoglas IBS GmbH will open.
- Make sure the contact data is up to date and change the details if necessary (mobile number still up to date?).
 Save your input.
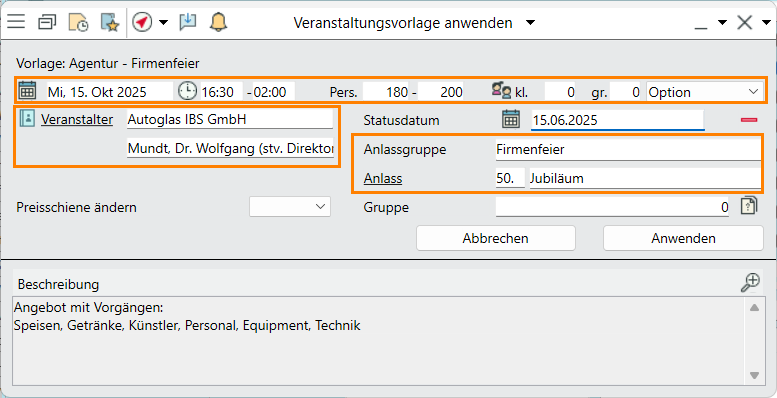
2. Create an event based on a template
- Create an event directly from the account by clicking on

 New in the toolbar, then select
  Event >
  Mundt, Dr Wolfgang.
 - Select the
 Company event template. The new event based on a template will open.
 - Enter the data from the email. Use the tab key to quickly and easily switch to the subsequent input fields.
Note: Hover your mouse over any field for a tooltip. - Organiser and Contact are already prefilled.
- Fill in the Occasion of the event by entering 50th in the first field, then select Anniversary in the following field.
- Confirm your entry by clicking Apply.
- Confirm the message concerning the inactive items by clicking OK.
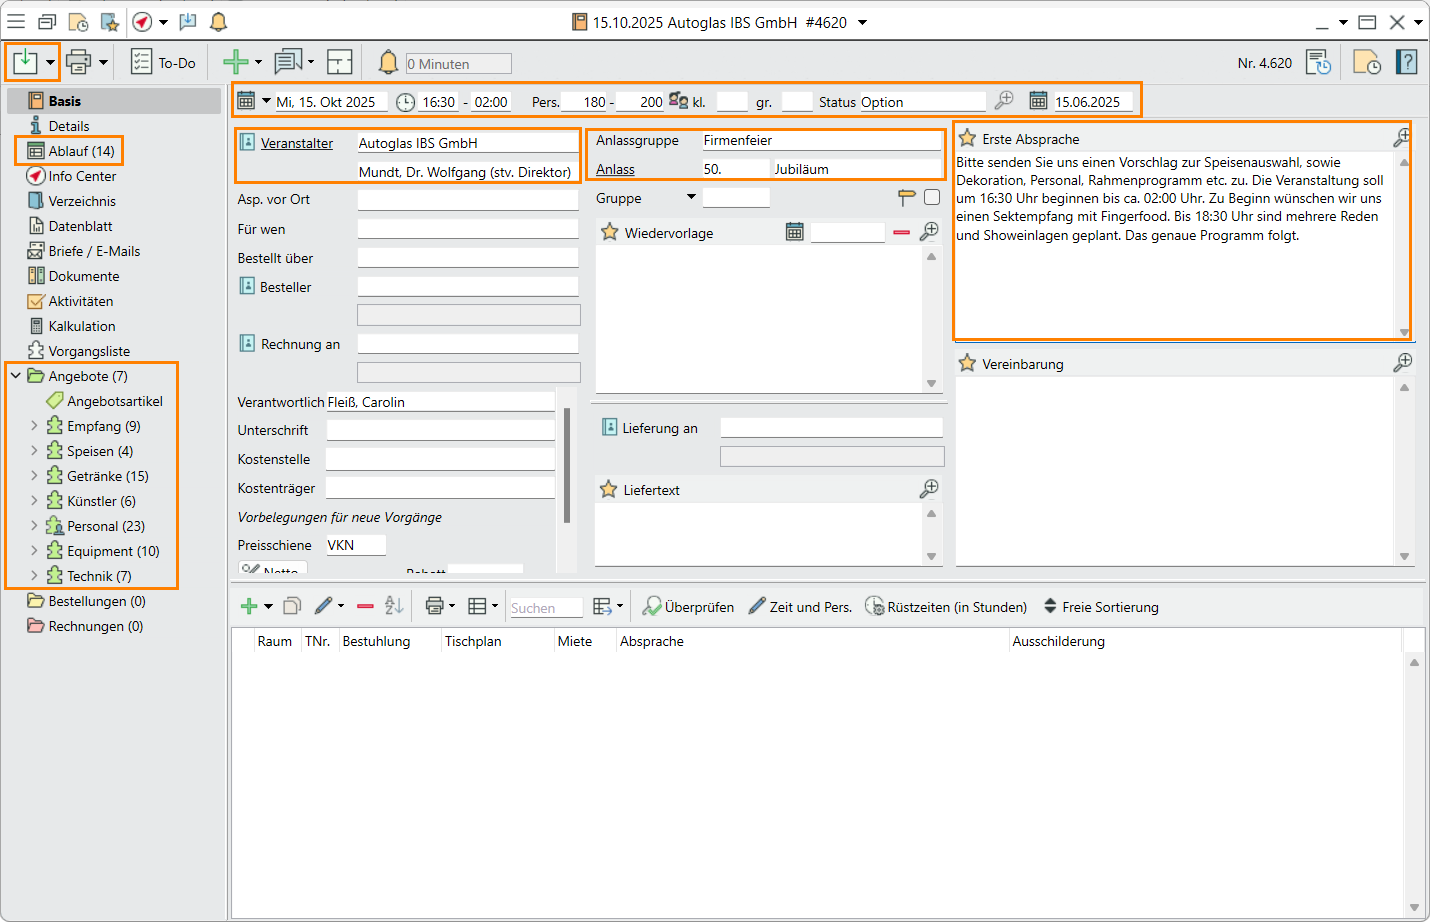
- The input window for the event will open with the information already entered.
- Add the missing information from Mr Mundt's email in the field Initial agreement on the right-hand side of the input window.
 Save and close the event.
Check out our YouTube Tutorial on Event Templates for more details. (German only)
Objective 2 Creating a quote
On completion of this exercise, you will have used the event search dialogue, customised items copied from the template and provided the customer with a detailed quote with selection options.
Carolin has received the following information by email:
Dear Ms Fixit,
Please send us an offer with several buffet suggestions including a small selection of wines and all other costs. We would like to include an aperitif and finger food for the reception.
Yours sincerely
Autoglas IBS GmbH
Dr. Wolfgang Mundt
Unter den Linden 54
40213 Dusseldorf
1. Open the Autoglas IBS GmbH event
- Go to the Home tab on the function bar and click on Events.
- Enter the event date in the date field of the search dialogue. Confirm your entry by clicking on
 Search.
 - Double-click the event on the list of results to open.
Note: Alternatively, open the event search dialogue by pressing F12 or open your Most recent records by pressing F3.
2. Check the booked items
The selected event template contains all the items that you offer by default for company celebrations. You only need to add individual requests.
- Check the items for Dr Mundt's offer by clicking on the dropdown triangle next to
 Quotein the side navigation.
 - A list of all
 Segments from the template will open.
 - Check the individual segments for completeness.
3. Make changes
- Book items by opening the segment in question. Click in the search field next to
 Add, enter the first few letters of the item name and press Enter to confirm.
 - A list of results matching the criteria will open.
- Select the item by left-clicking..
Note: If the search results in only one hit, the item will be inserted directly. - Remove unwanted items by selecting these items while holding down the Ctrl key for multi-select, then click on
 Remove in the toolbar.
 - Make the following changes:
a) Replace the Prosecco with the Fürst v.Metternich Extra dry 0.75 l in the Reception segment.
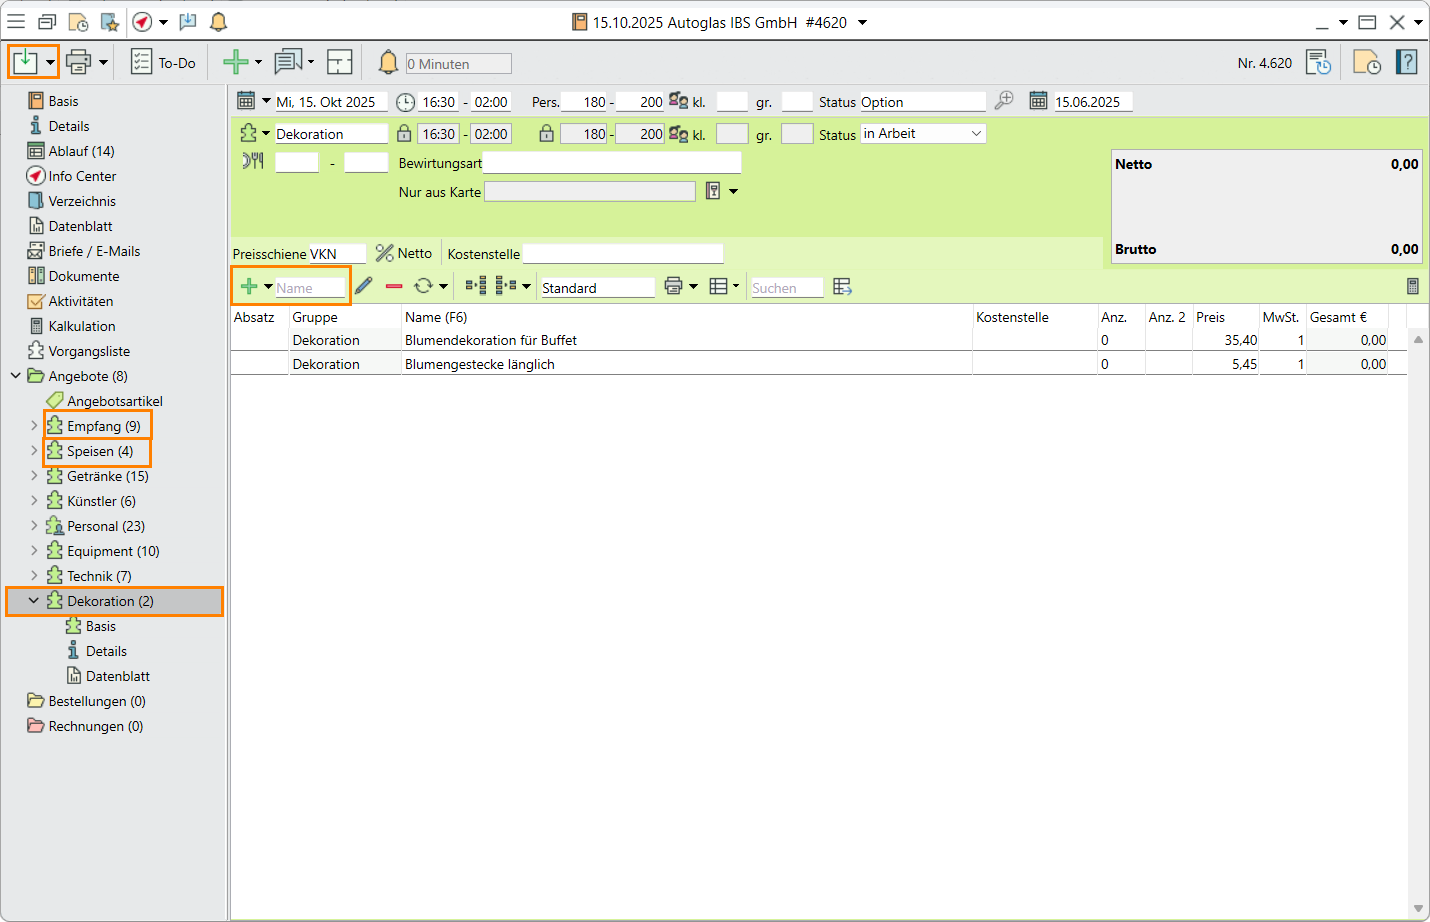
b) Right-click on Quotes > Add to create a new segment Decorations and book the items Buffet flower decoration and Oblong bouquet.
c) There are two inactive items (highlighted in yellow) in the Food segment. Replace them with "Southern specialities" and "Italian buffet".
Note: Make sure to specify a buffet for the maximum number of guests (number -> empty). - Move an item by dragging the item to the desired position while holding down the left mouse button.
Note: The item is always inserted one position below.  Save the event.
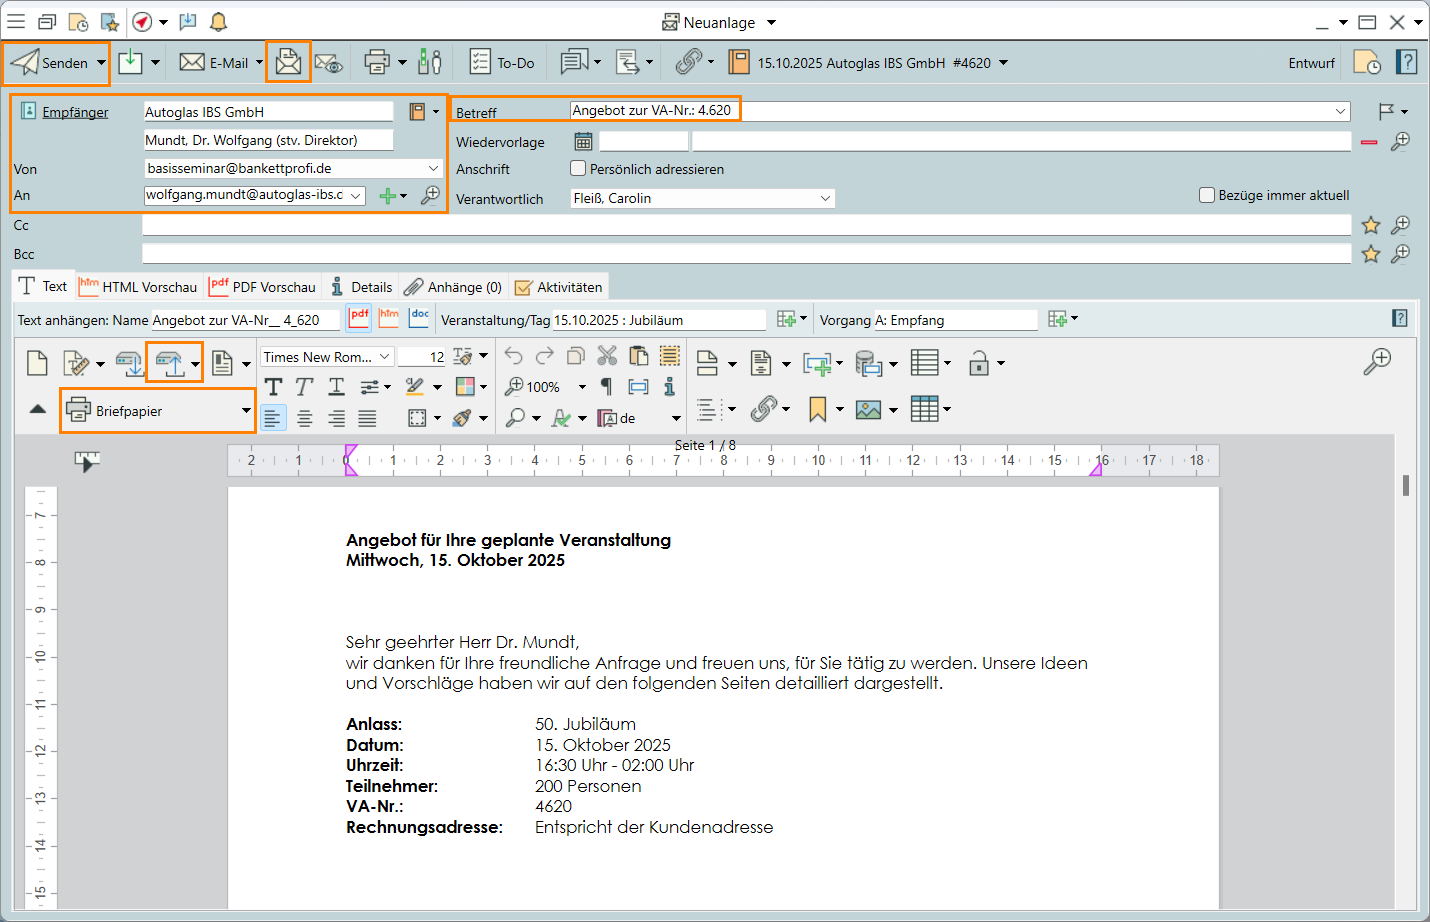
4. Print the quote
Once you have booked and checked all items, it is time to create and send a quote.
- Create a new mail by clicking on the dropdown triangle next to New in the toolbar, then select
 Mail > Herrn Dr. Wolfgang Mundt >
  Quote >
  Quote/Confirmation 1.
- The input window for creating a new mail/email will open with the organiser and event data prefilled, while the text and formatting are taken from the text template.
- Check the quote for correctness and completeness and make any necessary changes.
In this case, delete the schedule from the quote to add it at a later date. - Print the mail in PDF format by clicking on
 Save to hard drive >
  PDF in the toolbar.
Alternatively, send quote and cover letter by email. Click on in the toolbar and select New cover letter. The quote is automatically attached as a PDF document. Please do not click on Send for this exercise.
 - Save and close the quote.
Objective 3 Creating a detailed schedule
On completion of this exercise, you will have created a detailed schedule for the event with internal and external information, descriptions and responsibilities.
Carolin received the following information by telephone:
The CEO will give a speech of approx. 30 minutes at the beginning (with the aperitif).
Afterwards there will be a film/slide presentation on our company history, approx. 45 minutes.
The manager will open the buffet at 7 pm.
At around 9:30pm, the buffet can be dismantled except for dessert.
The social programme is scheduled to start at 9:30pm.
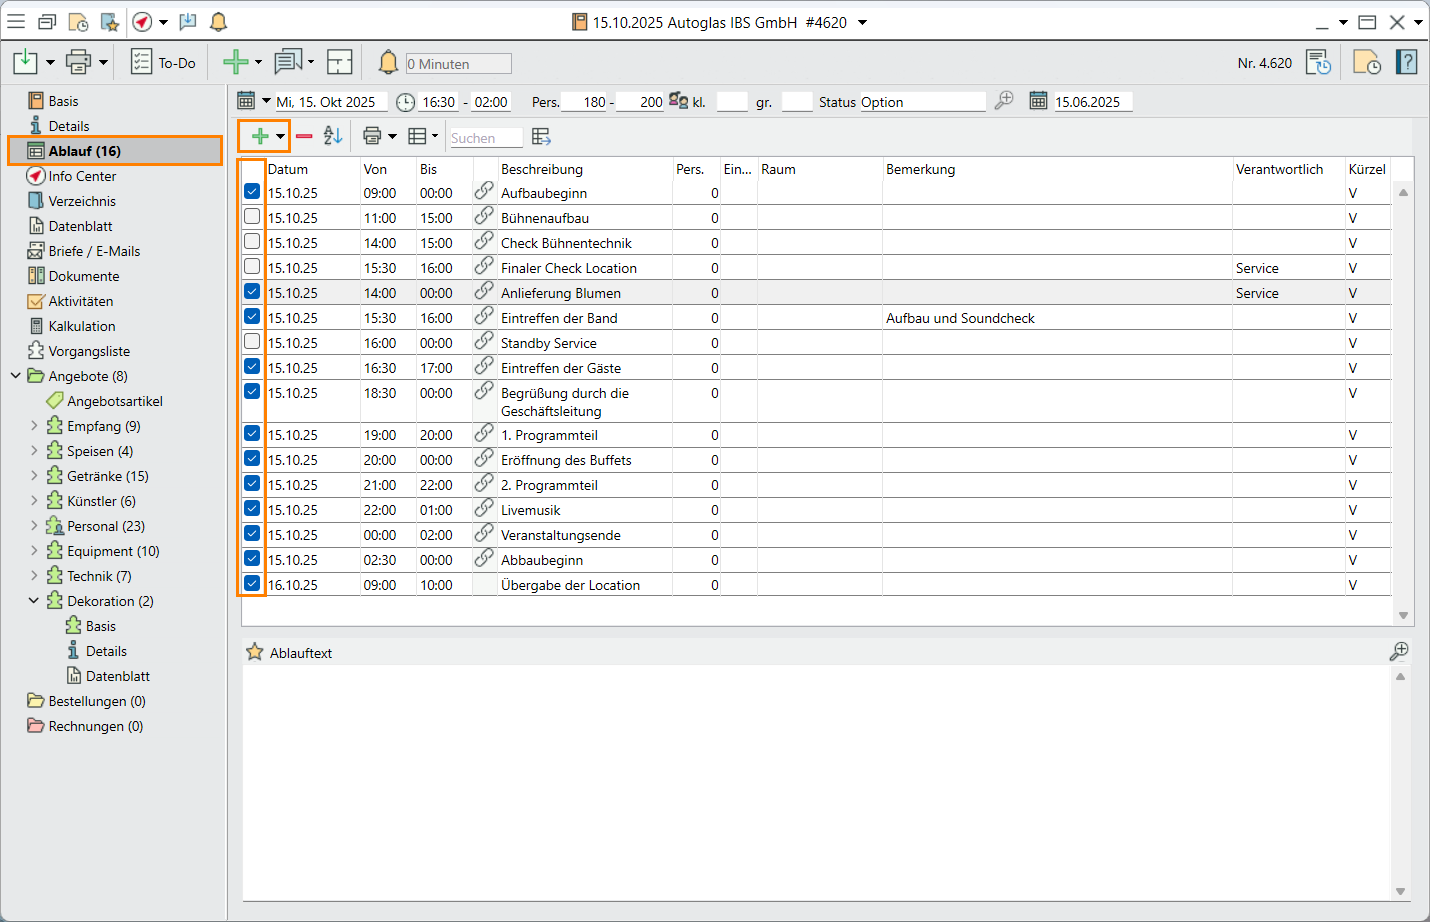
1. Create an event schedule
The schedule provides a detailed timeline of an event. Internal and external information is output on the relevant documents. All you need to do is tick a box.
- Open the
 Schedule in the side navigation.
 - The input window for the programme opens with suggestions from the event template.
- Enter the times and details from the phone call in the event schedule.
- Add a new schedule item by clicking on Add, then enter the details.
- Untick the schedule item in the first table column to mark it as "in-house".
Note: Internal schedule items will not show on quotes, contracts and invoices for the customer, but rather on in-house worksheets. - Delete a schedule item by selecting the row and clicking Delete in the toolbar. Hold down the Ctrl key while selecting rows for multi-select.
- Add the following items to the schedule:
a) Internal: Final check of the location at 3:30pm Responsible: Service staff
b) External: Flower delivery at 2pm Responsible: Service staff - Click on
 Sort to sort the items chronologically (date and time).
 - Save your input.
Read more on Planning events
Objective 4 Creating an order and printing out the customer contract
On completion of this exercise, you will have changed the event status, created an order segment, rejected a segment and changed the booked items.
Carolin received the following information by telephone:
The event will definitely take place
210 guests
Wines as listed
Floral decorations are organised by the customers themselves
Buffet American Barbecue
DJ Racoon
1. Change the event status
- Open the Autoglas IBS GmbH event again.
- Change the event status from On hold to Confirmed.
Note: The status date is automatically deleted. Use the follow-up for further reminders. - Enter the current number of guests in the Maximum number of guests field.
Note: The maximum number of guests is used for the items that are charged per person.
Advantage: in case the number of guests changes, that figure need only be corrected once.
2. Create an order
- Create an order segment by selecting the Quotes folder, then drag-and-drop it to the
 Orders folder.
 - Confirm the message by clicking on Copy.
- All segments and booked items are shown in the segment type Orders.
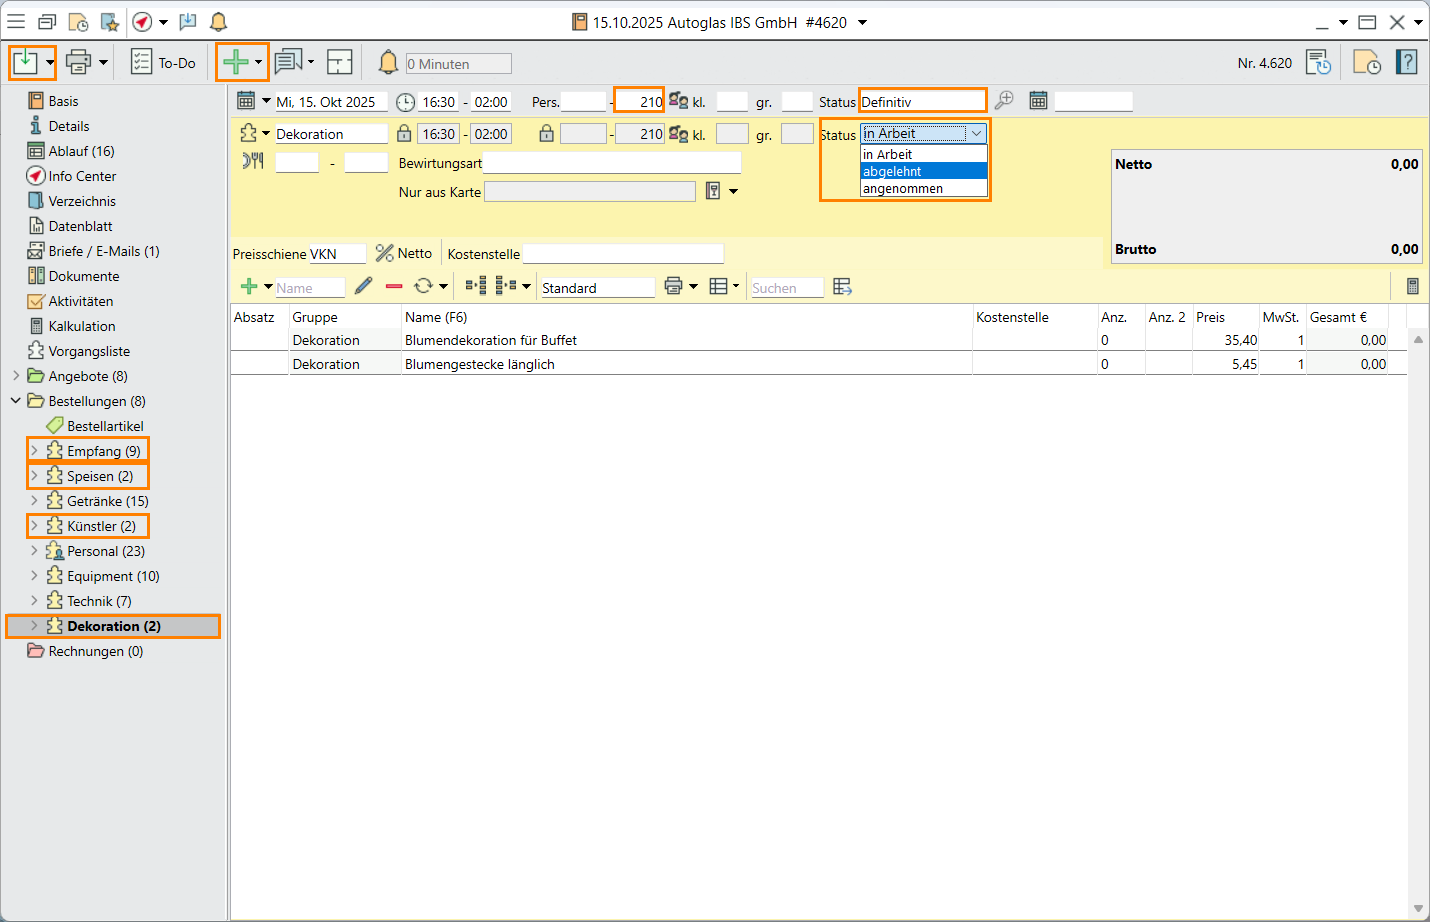
3. Customise items
- Remove unwanted items by selecting these items while holding down the Ctrl key, then clicking on Remove in the toolbar.
- Make the above changes.
4. Check the item count
- Enter a Count of "0" if the item is to be listed in the quote/contract at the unit price but is not to be included in the cost calculation. This is important for items for which the consumption is as yet unknown, e.g. for the wines and the aperitif. In this exercise, enter a count of "0" for drinks, wines and aperitifs.
- Select a count of "1" or any other figure if the item is to be sold by unit in the quote/contract. In our event, enter a count of "1" for DJ Racoon.
- For the calculation according to the maximum number of people, the "Count" column must be empty. Remove the number "0" from the "American Barbecue" buffet.
5. Reject the "Decoration" segment
The customer has decided to organise the decoration himself.
- Reject the segment by clicking on the
 Decoration segment in the side navigation.
 - Change the segment status from In progress to Rejected and confirm the message accordingly.
6. Print the contract
Once you have booked and checked all items, it is time to create and send a contract.
- Create a new mail by clicking on the dropdown triangle next to New in the toolbar, then select Mail > Herrn Dr. Wolfgang Mundt > Quote > Quote/Confirmation 1.
- The input window for creating a new mail/email will open with the organiser and event data prefilled, while the text and formatting are taken from the text template.
- Print the contract as a PDF document by clicking on > .
Alternatively, send contract and cover letter by email. Click on in the toolbar and select New cover letter. The quote is automatically attached as a PDF document. Please do not click on Send for this exercise. - Save and close the mail.
7. Create a follow-up
Create a reminder for a final briefing 4 days before the event.
- Go to the General tab in the side navigation.
- Create a follow-up by entering a Date in the Follow-up field in the centre of the input window. For this event, enter 05/MM/YYYY.
- Click on
 and select your options for the follow-up reason by pressing down the Ctrl key.
a) Request text for menu cards.
b) Double-check the number of guests.
Alternatively, enter any other text manually.
8. Change the event status
Dr Mundt has returned the signed contract to Carolin.
- Change the event status from Confirmed to Contract.
- Save and close the event.
9. Go to 11.MM.YYYY
Assuming that today is 11.10.YYYY, go to that day in the Info Centre.
- Open the Info Centre by pressing F8.
- Enter the date 11/10/YYYY.
- The Info Centre shows the entered date.
- You will find the reminder in the bottom part of the window under Follow-ups.
- Open the event by double-clicking it in the list of follow-ups.
- After you have received all the information from Dr Mundt, Delete the follow-up.
Objective 5 Creating a custom menu card
On completion of this exercise, you will have created a custom menu card with a picture and printed it.
Carolin received the following information by telephone:
Menu card text: Celebrating 50 Years in the Business!
Logo for the menu card to be found in the customer account in Bp Event
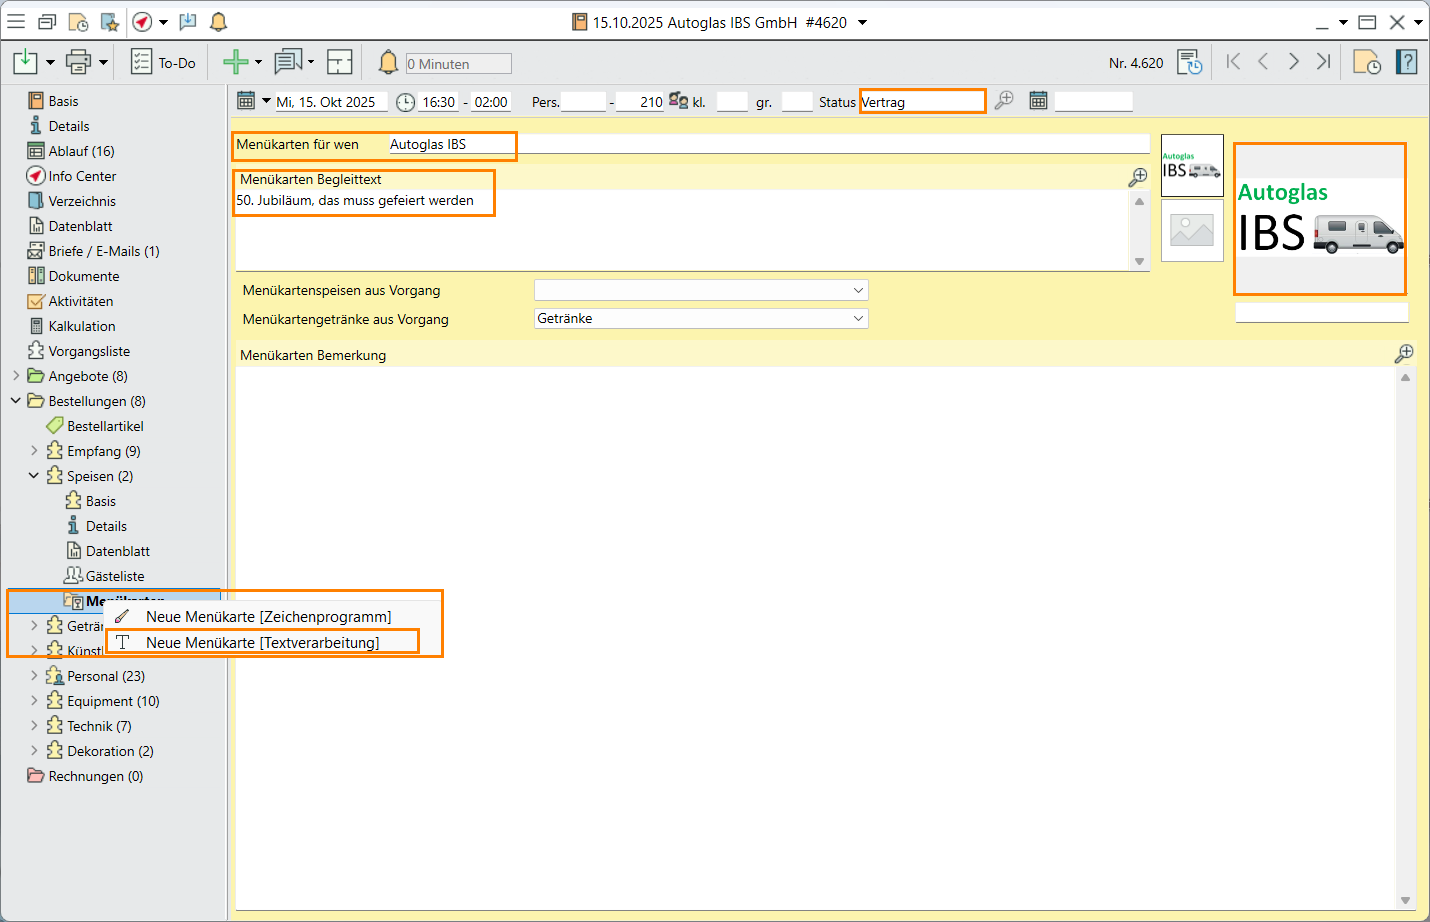
1. Enter the custom texts
- Create the menu card for Autoglas IBS by clicking on the expand arrow in front of the Order icon in the side navigation.
- Click on the dropdown triangle next to Food.
- Click on
 Menu cards.
Note: Menu cards can only be created in order segments. - Fill in the field For whom with "Autoglas IBS" and fill in the field Accompanying text with "Celebrating 50 Years"
- Select "Drinks" from the picklist for Menu card drinks segment .
2. Add an image
- Open the Autoglas IBS GmbH account.
- Go to
 Added fields in the side navigation.
 - Copy the logo to the clipboard by selecting it and pressing the Ctrl+C hotkey.
- Go back to the Menu card tab in the side navigation.
- Insert the image into the menu card by selecting the small photo frame in the top right-hand corner of the input window.
- Then switch to the large photo frame and click on Add.
- Insert the logo by selecting
 from clipboard.
3. Print the menu card
- Open the menu card view by double-clicking on Menu cards.
- Select
 New menu card [Word processing]
 - The menu card is created automatically.
 Print the menu card.
- Save and close the event.
Objective 6 Creating worksheets for kitchen and service staff
On completion of this exercise, you will have printed out worksheets for all departments and provided further information.
All information must now be passed on to the responsible departments. To do this, Carolin prints worksheets for the events office, kitchen and service staff with the department-specific information.
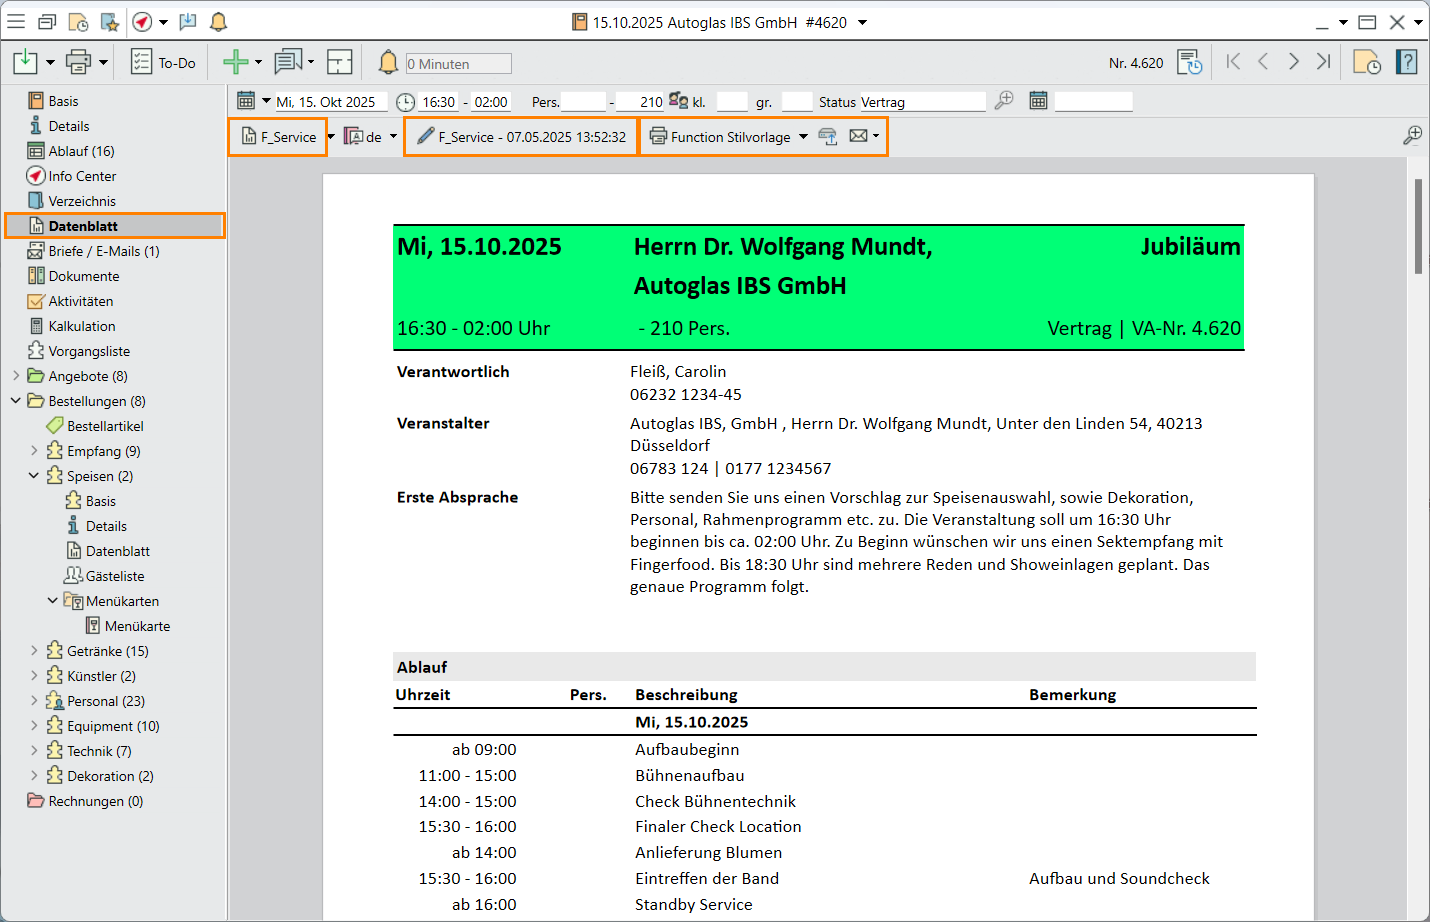
- Go to Data sheets > <Select datasheet> > F_Service in the side navigation.
- The service datasheet is created with all relevant data and can be printed, generated as a PDF file or sent by
 Email.
Note: whether or not a datasheet has already been created can be traced in the History of the event (top right).
 - Now print the datasheet F_Küche.
-> Do you want to highlight important information for the department before printing?
- Click on
 F_Service (Datum) in the toolbar.
 - The datasheet opens in the directory.
- Make changes. In this example, highlight the changed number of guests by marking the number of guests in bold and in red.
- Print the document.
- Save and close the directory.
Note: If a datasheet has been edited and save, it is listed in the side navigation under Directory.
Read more on Running events
Objective 7 Generating an invoice after the event is over
On completion of this exercise, you will have created a new account and entered it as an invoice account, entered figures for the actual consumption of items and generated an invoice.
Carolin receives the following information by email:
The invoice address is different from the organiser's address:
Autoglas IBS GmbH
Cologne branch
Prof. Dr. Albert Kohlmann
Poststraße 48
50667 Köln
Phone: 0221 223344-55
E-Mail:This email address is being protected from spambots. You need JavaScript enabled to view it.
1. Enter the invoice address
By default, the organiser's account is used as the invoice address. Enter an additional address only if you need to distinguish between the two.
- Go to the General tab of the event.
- Input the invoice adress by entering the first few letters of the name in the Invoice to field on the Home tab of the event, then confirm by pressing Enter. A list of matching accounts will open.
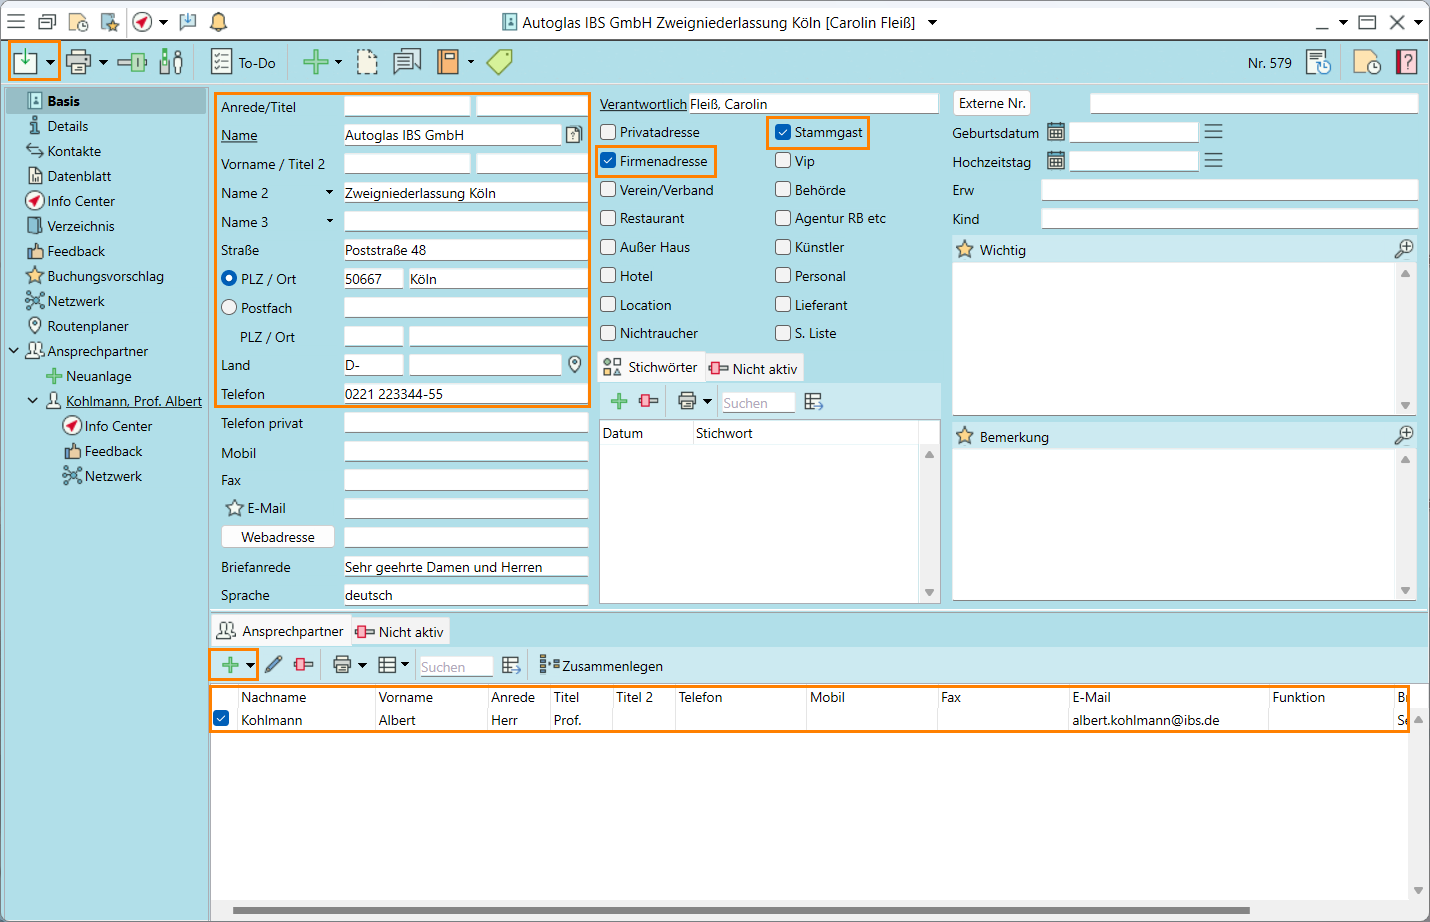
Note: The account and contact person have not yet been created in the system. - Click on in the toolbar to create a new account containing the above information.
- Assign the categories Company account and Regular guest.
- Save and close the account.
- Select the new account in the list and
 Confirm.
 - The invoice account is automatically copied.
Note: Only add an invoice address if you need to differentiate from the organiser's address.
2. Create a new invoice segment
- Create an invoice segment by selecting the Orders folder, then drag-and-drop it to the
 Invoices folder.
 - Confirm the message by clicking Total invoice.
- Confirm the preset segment name "Invoice" by clicking OK.
- Select Separator texts and Subtotals for better readability.
Note: The names of the individual segments are thus inserted as separator texts. Subtotals are created for each segment for improved readability. - The actual quantity (consumption) per item is entered in the invoice. Select Leave count undefined for segments whose items are not charged per person. This count must be adjusted manually in the segment.
- The invoice inout window will open containing all items from the order segment.
3. Enter the actual consumption figures
Carolin receives the following information from the event manager:
Beverage consumption Autoglas IBS on 15/MM/YYYY
31 bottles of sparkling wine
11 bottles of white wine
9 bottles of red wine
3 bottles of Pinot Blanc
214 bottles of mineral water 0.75 litres
8 bottles of cola 1 ltr.
0 bottles of Fanta 1 ltr
2 bottles of orange juice 1 ltr
17 litres of beer
4 bottles of apple juice
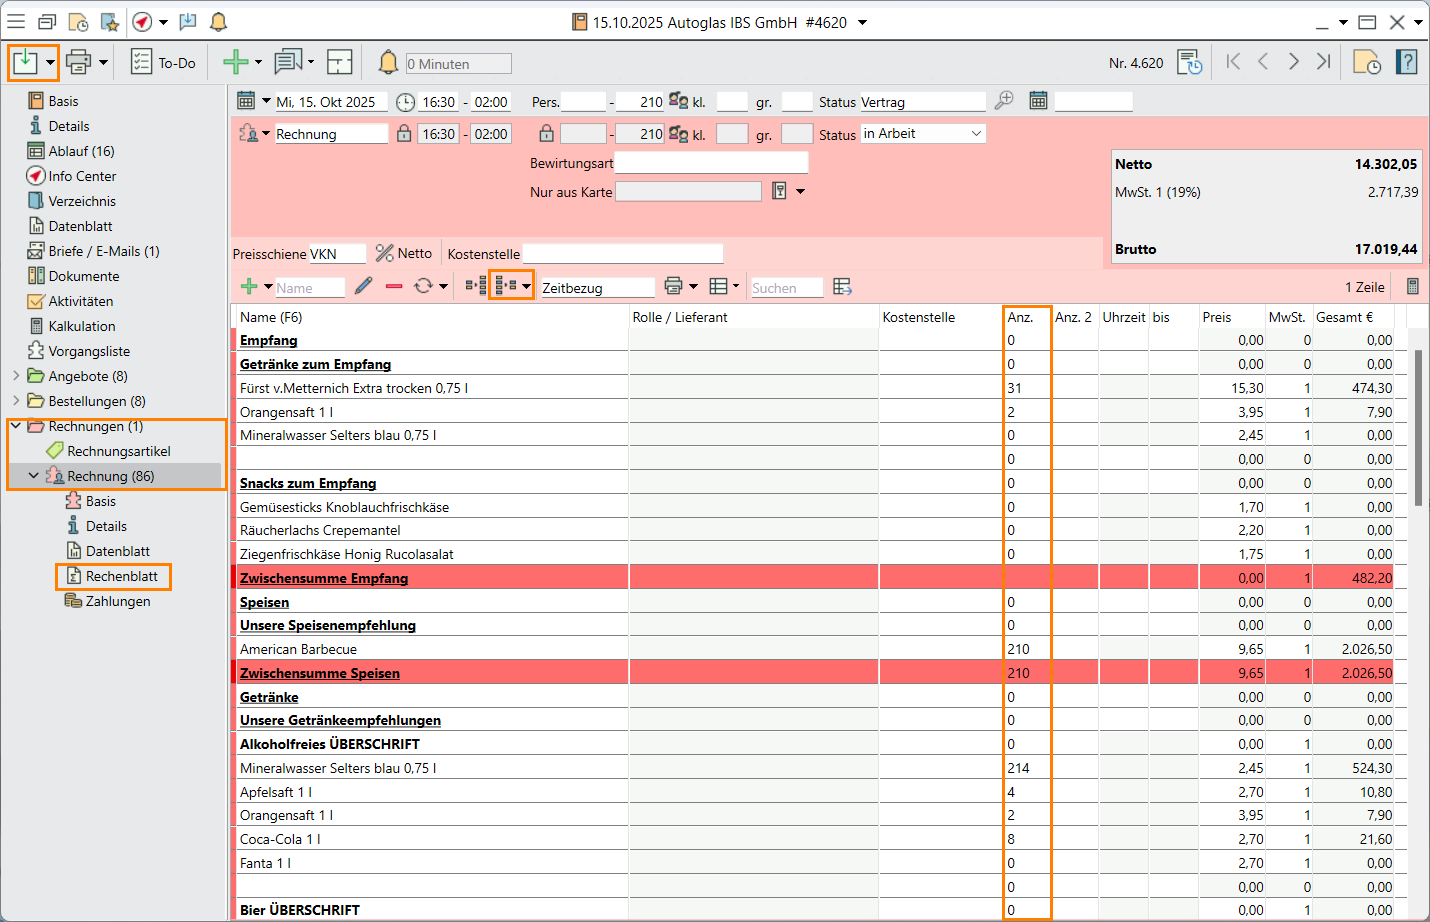
- Enter the actual consumption in the "Count" column.
- Enter a plausible number of staff and their working hours.
- Remove all items with a count of 0 by clicking on
 Collapse. All items without a count, including remakrs, will be removed. Confirm the message by clicking Collapse items.
4. Print the invoice
- Click on the dropdown triangle next to
 Invoice and select
  Spreadsheet.
 - Save the event.
- Confirm the assignment of a consecutive invoice number by clicking OK.
- Click on Save to hard drive > PDF in the toolbar and confirm the message by clicking Export and lock.
5. Finalise the event
- Go to the General tab of the event and change the event status to Closed.
- Save and close the event.
Read more on Finalising events or refer to our YouTube Video Tutorials. (German only)
Objectives of Tutorial 6 achieved:
- Created an event
- Created a quote
- Created a detailed schedule
- Created an order and printed out the customer contract
- Created a custom menu card
- Created worksheets for kitchen and service staff
- Generated an invoice sent after the event
Congratulations!