Tutorial 7 Working with accounts
Training material 2025 / 2026
Tutorial 7
Working with accounts

Performance level: Advanced
Time needed approx. 50 to 60 minutes
The exercise can be interrupted and saved at any point.
Start Bp Event and log in as
User: Carolin
Password: cf
Carolin Fixit works in the Banqueting department of a private hotel. Addresses have been researched for an advertising campaign and now accounts need to be created in Bp Event. A bulk mail is to be sent to each contact person listed under these accounts. In between, the phone rings from time to time, Caroline needs to take contact notes and forward call-back requests from customers to colleagues.
Training objectives:
- Creating and categorising accounts and contact persons
- Creating a bulk mail template
- Selecting accounts and printing bulk mails
- Searching for accounts, creating contact notes and forwarding information
- Adding a customer discount
- Calling up a closed invoice
Objective 1 Creating and categorising accounts and contact persons
On completion of this exercise, you will have created new accounts and contact persons, assigned categories and keywords.
Carolin researched the following addresses online:
Company account
Holdinger GmbH
Bahnhofstraße 77
70173 Stuttgart
Phone: 0711 6898777-0
Email:
Contact:
Frau Miriam Wieser
Phone: 0711 6898777-15
Email:
Position:
Assistant to the Manager
Company account
Hucker GmbH
Greifengasse 5
70184 Stuttgart
Phone: 0711 55334-0
Email:
Contact:
Herr Joachim Heilmann
Phone: 0711 55334-15
Email:
Position:
Sales Manager
Company account
Mahler GmbH
Muhlenweg 17
70437 Stuttgart
Phone: 0711 3664-0
Email:
Contact:
Frau Jasmin Mahler
Phone: 0711 3664-11
Email:
Position:
Managing Director
Private account
Katharina Klieber
Birkenweg 27
70197 Stuttgart
Phone: 0711 12356
Mobile: 0152 3665544
Email:
Private account
Wolfgang Sauber
Nelkenweg 18
70199 Stuttgart
Phone: 0711 5553366
Mobile: 0171 3688544
Email:
Private account
Matthias Sommer
Kleiberring 26
70199 Stuttgart
Phone: 0711 21796
Mobile: 0162 3677544
Email:
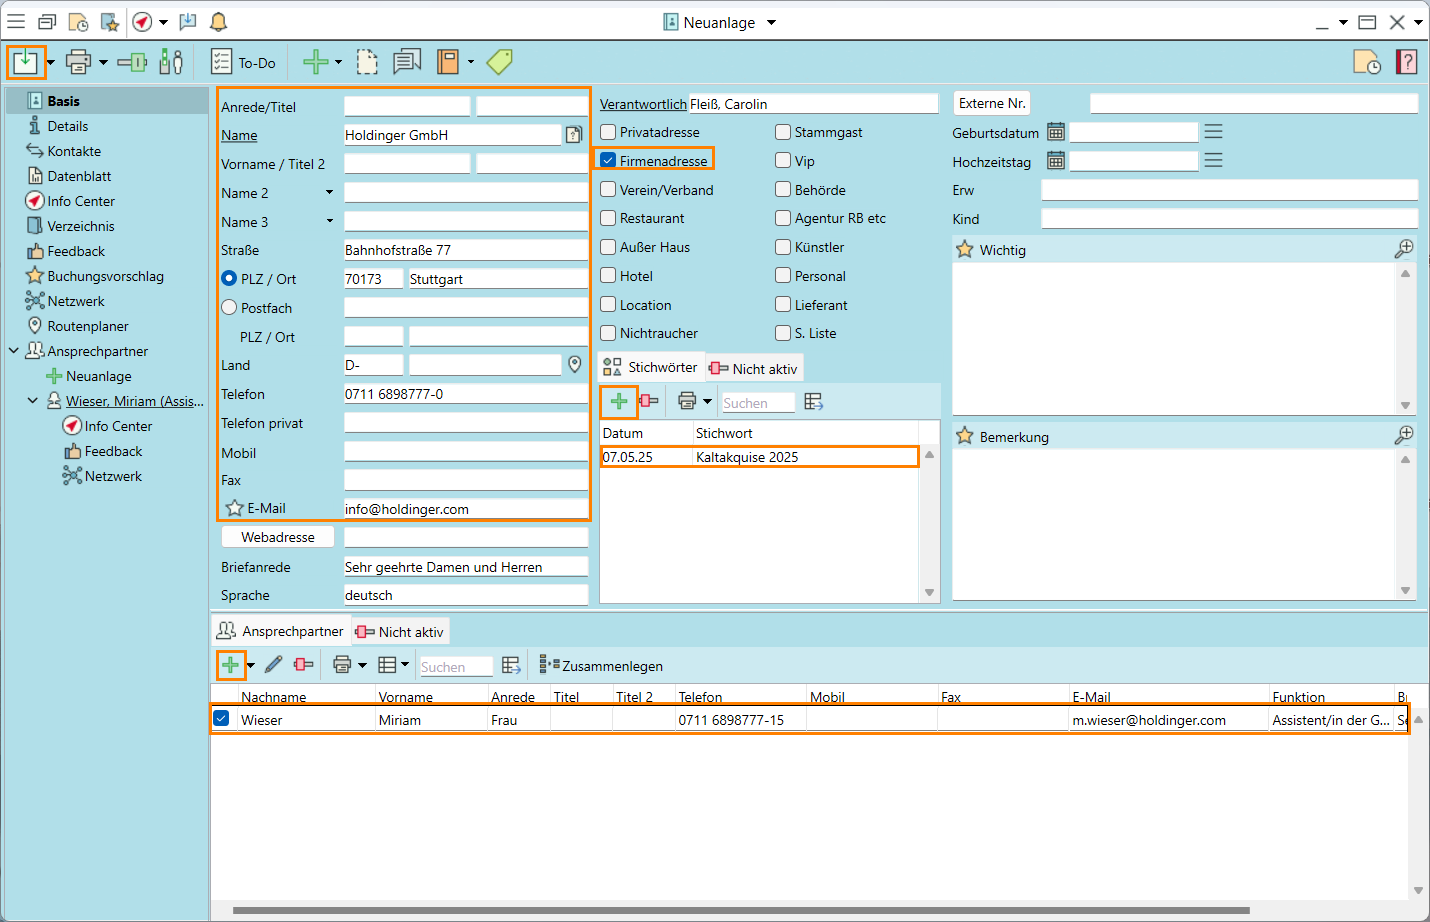
1. Create a company account
- Go to the
 Home tab on the function bar and click on the dropdown triangle next
 Accounts, then select
  New.
New. - Enter the above data in the respective fields of the account input window.
Note: Don't input the Title field for company accounts . - Tick the box for Company Account.
 Add the new Keyword "Cold call YYYY" (YYYY = year) in the small input field and press Enter to confirm. This will help you call up the account later.
Alternatively, add the keyword to the picklist and then apply.
2. Create contact persons
- Go to the
 Contacts tab at the bottom of the input window and click on
  Add.
Add. - Tick the first column to mark this contact person as your primary contact.
- Enter the contact person's data in the corresponding columns.
 Save the account.
3. Create a private account
- Go to the
 Home tab on the function bar and click on the dropdown triangle next
 Accounts, then select
  New.
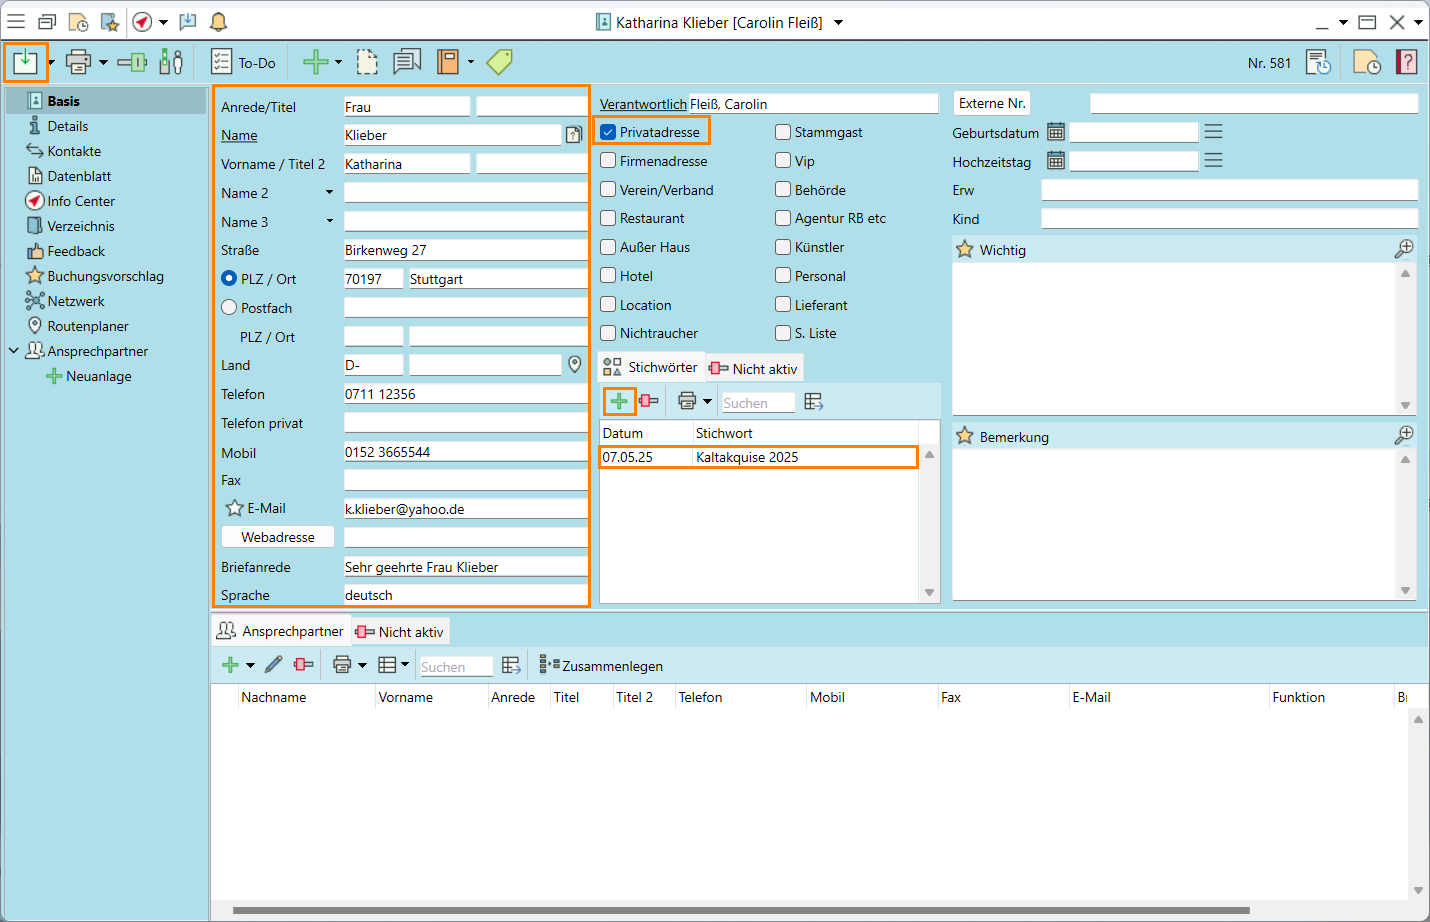
New. - Enter the above data in the respective fields of the account input window.
Note: Always input the Title field for private accounts. - Tick the box for Private Account.
 Add the new Keyword "Cold call YYYY" (YYYY = year) in the small input field and press Enter to confirm. This will help you call up the account later.
Note: Avoid special characters in the keyword
Read more on Accounts and Contacts
Objective 2 Creating a new bulk mail template
On completion of this excercise, you will have copied an existing text template and inserted your advertising copy.
Carolin received the following text from the advertising agency by email:
Private and Business Events in Stuttgart
- "Life is made up of small pleasures."-
Our venue and staff are ready and at your disposal, be it for a conference, a meeting, a seminar, a business event or a fashion show in Stuttgart. Of course we also cater to weddings, family celebrations and private parties.
Why not join us for one of our famous Sunday brunches and be thoroughly spoiled for once.
We look forward to seeing you!
1. Copy an existing bulk mail template
References to database records are used in mail templates to ensure that bulk letter, bulk mails or a newsletter is adressed personally. For the sake of simplicity, we will use and adapt a copy of an existing template in this task.
- Open the
 Function bar, then go to the
  Templates tab and select
  Text templates to open the search.
 - In the search window, click on Group/Type, select Bulk Mail,
 Apply and confirm your selection by clicking
  Search. A list of bulk mail templates will open.
 - Left-click the template Mailing cold accounts for party service.
- Click in
 Copy in the toolbar to open a copy of the template.

2. Customise the data
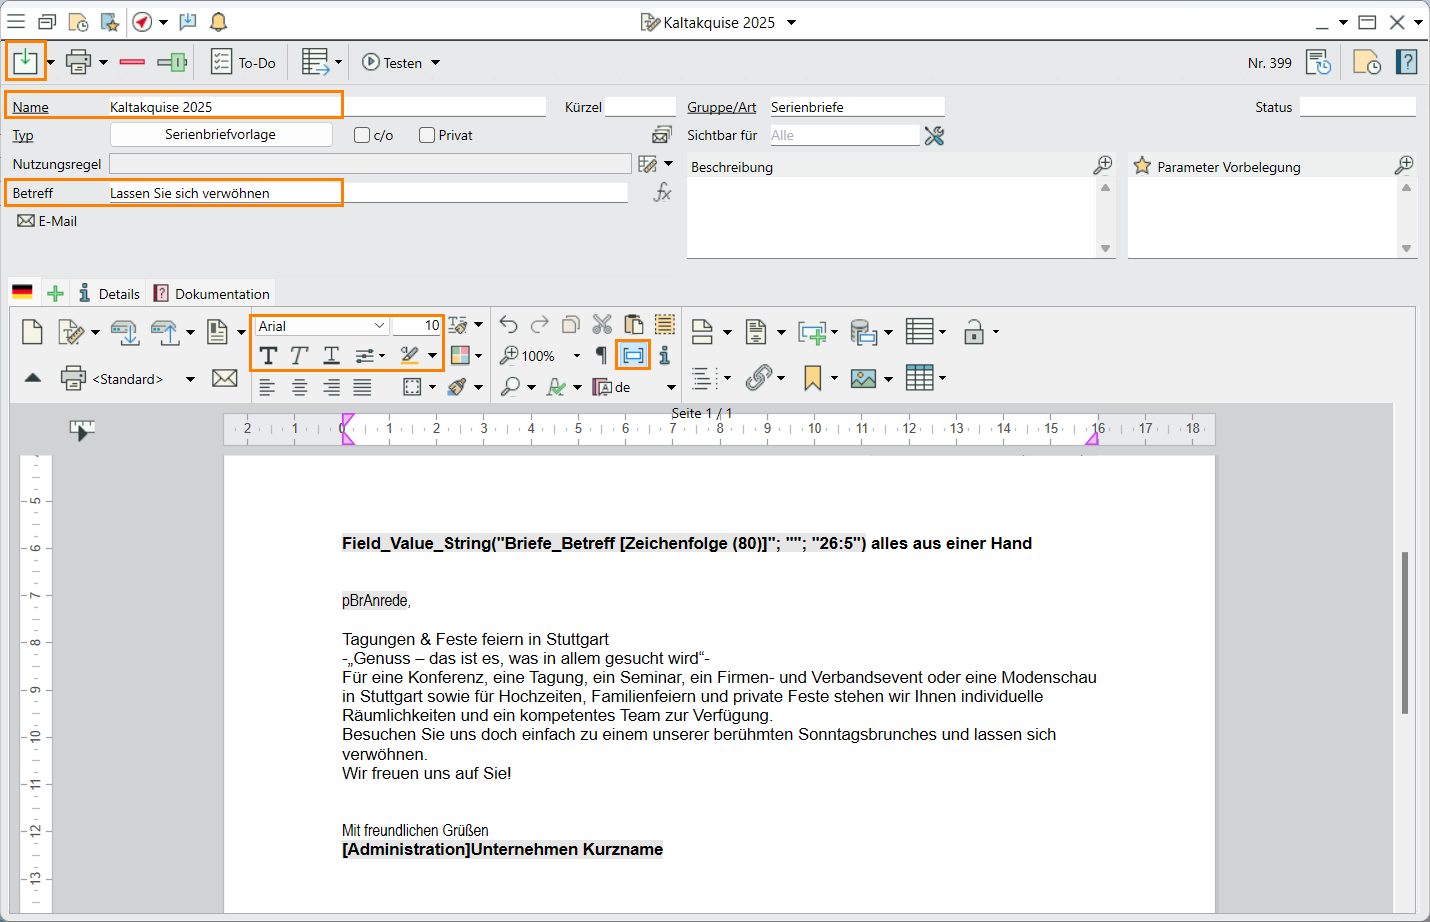
- Change the Name of the template to Cold call YYYY.
- Change the subject of the mail to For once, allow yourself to be thoroughly spoilt.
- Activate
 Show 4D expressions in the toolbar in order to highlight fixed database references (e.g. account, current date, greeting formula). These are marked in grey in the text and must not be changed.
 - Copy the text from the advertising agency.
- Paste the text into the templates by selecting the existing text between the salutation and greeting formulas and pasting the copied text using the Ctrl+V hotkey.
- Correct the layout, font etc. and add page breaks if necessary.
 Save and close the template.
Objective 3 Calling up accounts and (not) printing a bulk mail
On completion of this exercise, you will have used the advanced search options, selected accounts for a bulk mailing and printed a mail merge.
1. Search for accounts
- Go to the
 Home tab in the
  function bar and click on
  Accounts. The account search input window will open.
Alternatively, press the F10 shortcut key to open the search. - Click on the dropdown triangle to open the Account Keywords menu.
- Enter the keyword "Cold call YYYY" and click on
 Search.
 - A list of accounts with matching keywords will open.
2. Print the letters
- Click on
 Select operation and apply to list in the toolbar.
 - Select "Print bulk mail".
- The list of matching bulk mail templates will open.
- Select the Cold call YYYY template and
 Confirm.
 - For the purposes of this exercise, please confirm the message "Do you really want to print x letters?" by clicking "No".
3. "Delete" an account
Accounts cannot be deleted from the database by Bp Event users, but they can be marked as "inactive" records. These will not be included in the regular search results.
- Open Wolfgang Sauber's account.
- Set the account to on
 Inactive.
  Save and close the account.
Read more on Bulk Mail
Objective 4 Searching for accounts and creating contact notes
On completion of this exercise, you will have called up an account, created a contact note, sent an internal message and set a reminder.
The phone rings in the events office. A call from Dr Karim Hesali.
Dr Hesali would like to reserve a room for the christening of his little daughter Emma. The christening will take place on Sunday, DD.MM.YYYY. They are about 15 people and would like to have the red room, is it still available?
Please call back Banqueting. Mr Hesali will be available on the landline tomorrow between 10 and 11am.
1. Search for an account
- Go to the
 Home tab in the
  function bar and click on
  Accounts. The account search input window will open.
Alternatively, press the F10 shortcut key to open the search. - Enter the first few letters of the search term, i.e. "Hesa", and press Enter to confirm.
- Double-click the account t.
- The input window for the customer account will open.
2. Create a contact note
- Go to the
 Contacts tab in the side navigation.
 - Click on
 New to open the input window for a new contact note. The account name, current date and current user are prefilled.
 - Enter the subject and fill in the text field with the above information.
 Save your input.
3. Write an internal message from the contact note
The Banquet Manager, Mr Federle, must be informed of the meeting.
- Click on
 Mail in the toolbar.
 - The input window for internal messages will open with all the data from the contact note prefilled
 Add Mr Federle as recipient.
- Complete the text if necessary.
 Send the message.
- Click on

 Save >
  Save and close.
4. Create a follow-up and set a reminder
The banquet manager has been informed of the call by an internal message. In addition, a follow-up and reminder should be created for the callback so it will not be forgotten.
- Go to the
 Contacts tab in the side navigation.
 - Select Mr Federle from the picklist.
- Create a follow-up for
 tomorrow.
 - Set a
 Reminder for 10 minutes before the 10am call.
  Save your input.
Objective 5 Adding a customer discount
On completion of this exercise, you will have entered a discount for a regular customer, to be automatically applied to all items for every event.
Memo from management
Dr Hesali will receive a regular customer discount of 2% on our entire product range with immediate effect. Please enter this in the customer account.
1. Enter a discount
If a customer is to receive a discount on everything, save this piece of information in the customer account.
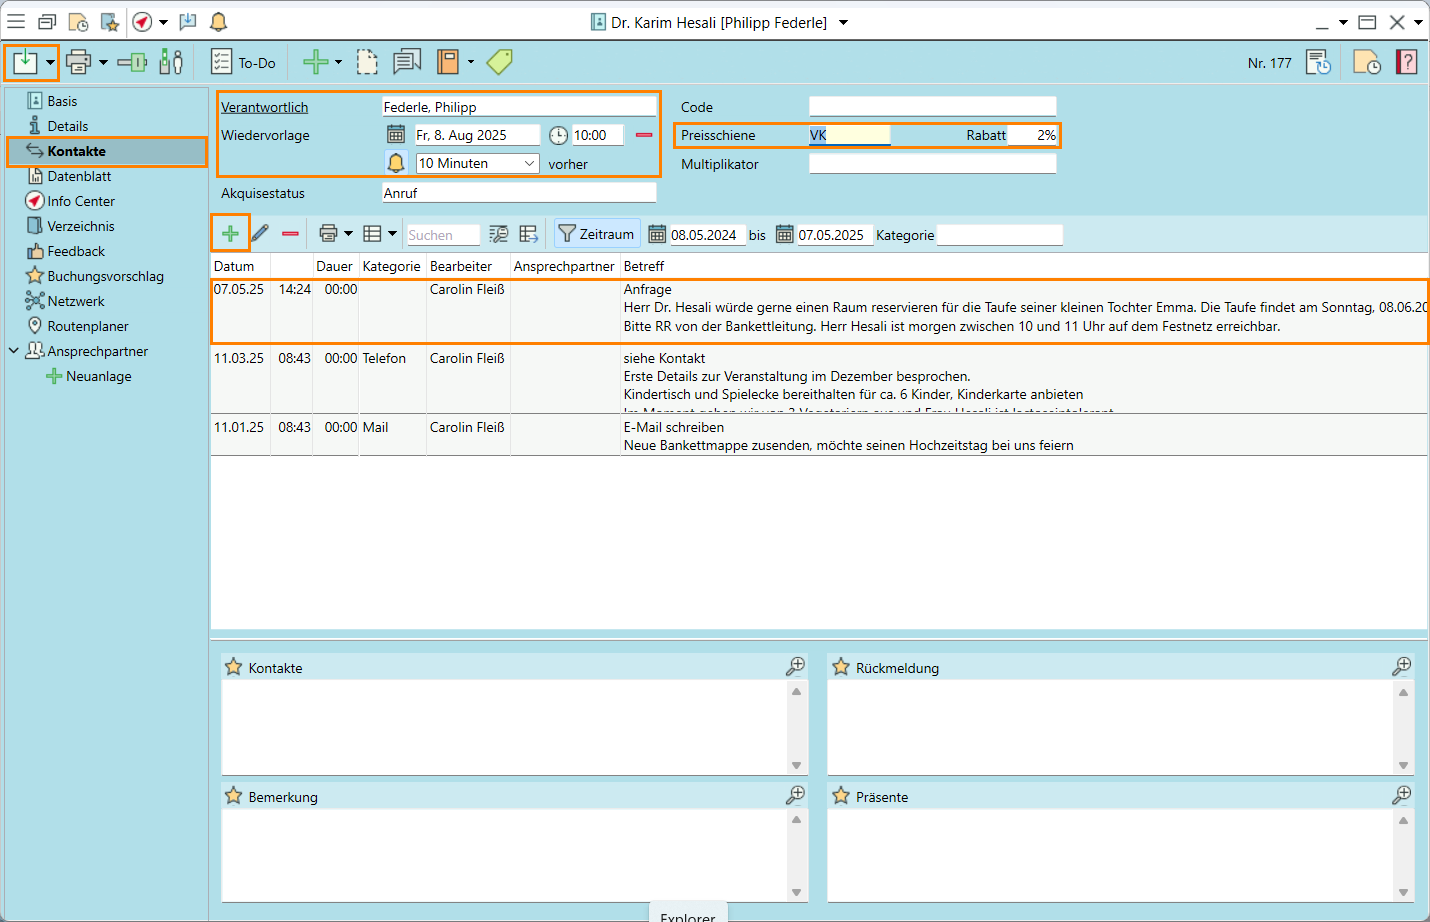
- Go to the
 Contacts tab in the side navigation.
 - Select the SP (sales price) price range.
- Enter "2" in the SUR/DIS field.
 Save and close the account.
Objective 6 Calling up and re-sending an invoice
On completion of this exercise, you will have located and re-sent an invoice issued earlier.
The phone rings in the event office. A call from Mr Reiner Lange.
I need a copy of the invoice for our event on 16 January 2017 for my accounts department. Can you please send it to me by regular mail? Law firm Lange Partner Rechtsanwälte
1. Open the account
- Go to the
 Home tab in the
  function bar and click on
  Accounts. The account search input window will open.
Alternatively, press the F10 shortcut key to open the search. - Enter the first few letters of the search term, i.e. "Lan", and press Enter to confirm.
- Double-click the account t.
- The account input window will open.
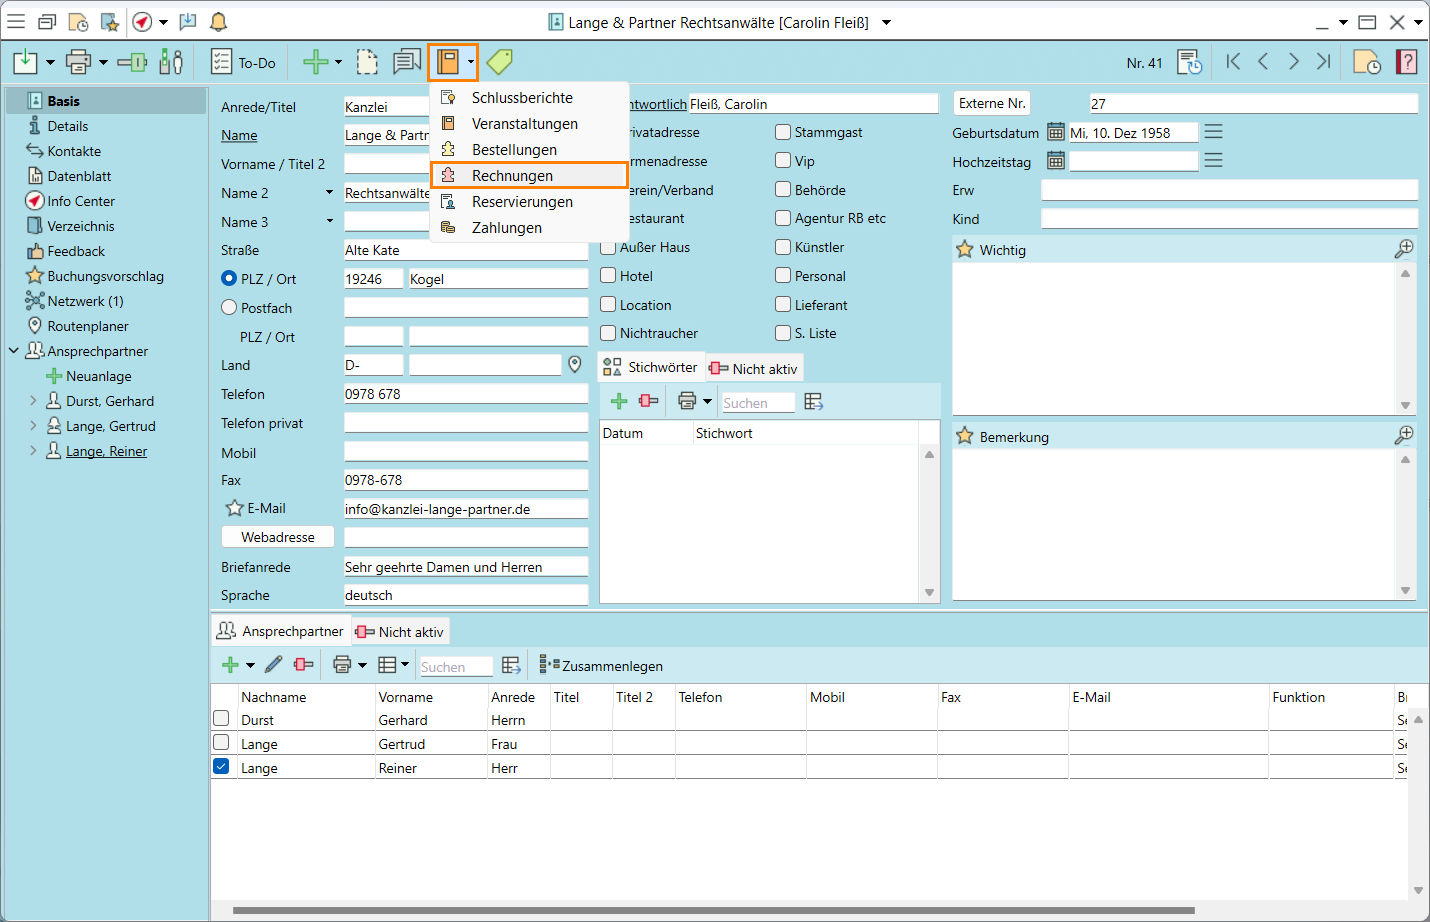
2. Call up the invoices
- Click on the dropdown triangle next to

 Events in the toolbar and select
  Invoices.
 - Select the invoice dated Dec 9, 2024 by double-click.
- The invoice can now be printed and re-sent.
Objectives of Tutorial 7 achieved:
- Created and categorised company and private accounts
- Created a bulk mail template
- Printed a bulk mail addressed to selected accounts
- Searched for accounts, saved and forwarded information
- Added a customer discount
- Called up a closed invoice
Congratulations!

